 Belgium
 Canada
 Germany
 Italy
Italy France
 Spain
Spain United Kingdom
Data containers
Data containers are a destination option for System Protection backups, to certain media types. Data containers make backups more portable and enable backup history retention to network and RDX destinations.
Online Guide
Overview
A Data container is an image file that backups can be stored in. It is selected on the backup Destination screen and configured in the Set up destination screen. You can configure the Data container’s size or allow it to use all available space on the destination.
Considerations
- The Data container’s size will increase as data is added until it reaches the set size or fills the backup destination, if Use all available space was selected.
- The Data container is created the first time the backup job runs, or if you run a destination check.
- A destination check is run on the Set up destination screen for fixed media, and when portable media is prepared on the Prepare media screen.
- If you set a maximum size, that maximum size cannot be changed one the Data container has been created.
Data container options
Windows Server 2008 - 2TB limit
- Uses VHD Data containers.
Windows Server 2012 R1/R2 and Window 8/8.1 - up to 64TB
- Uses VHD for Data containers 2TB and smaller (Required by default for Linux-based NAS devices).
- Uses VHDX for Data containers larger than 2TB.
A VHDX Data container will be created if the Data container’s size is set at 2TB or more, or if it is allowed to Use all available space on a destination that is 2TB or larger.
If you configure the Data container to be 2TB or smaller, or allow a Data container to grow into the available space on a destination that is 2TB or less, the Data container will use VHD.
Migrating from VHD to VHDX
If there is no VHD Data container at the backup destination, a Windows Server 2012 backup job will create a VHDX Data container when a backup job runs. You can therefore change from VHD to VHDX by archiving and removing the existing VHD Data container, and allowing the backup job to create a VHDX container when it runs next. The backup job must of course be configured to create a 2TB or larger Data container. Alternatively, you can convert the VHD to VHDX.
Microsoft provides instructions on converting VHD to VHDX using Hyper-V Manager and PowerShell.Helpful hint: BackupAssist automatically mounts Data containers when backups and restores are performed. However, there may be times when you want to do this manually. For example, if you want to check what is inside a Data container or have it available for another task. To manually mount a Data container, please refer to the steps outlined in our blog article.
Avantages of Data containers
Maintain Backup history
BackupAssist System Protection creates full and incremental image backups. Windows VSS maintains historical information so that each incremental backup can be restored from. On RDX drives and network destinations (e.g. NAS), VSS is not supported so Windows cannot maintain any backup history. This means restores can only be performed from the last backup.
Data containers overcome this Network/RDX destination limitation. The Data container is created on the destination media and each time the backup jobs runs, the Data container is mounted and treated as a local disk. Because the container is seen as a local disk, Windows VSS can maintain historical information of data that changed, and every backup can be restored from.
RDX granular restore
When Windows detects an RDX drive, it will compress the data that is being backed up. This compression means that individual files cannot be restored. By using a Data container, Windows will see the destination as a local drive and not compress the data.
Portable backups
On Windows 2008R2 and later, you can copy a backup image to another device, but only the last backup can be restored because you cannot copy the shadow copy (VSS snapshot). If the backup is in a Data container, the snapshot can be moved and all backups can be restored from.
Creating a Data container backup
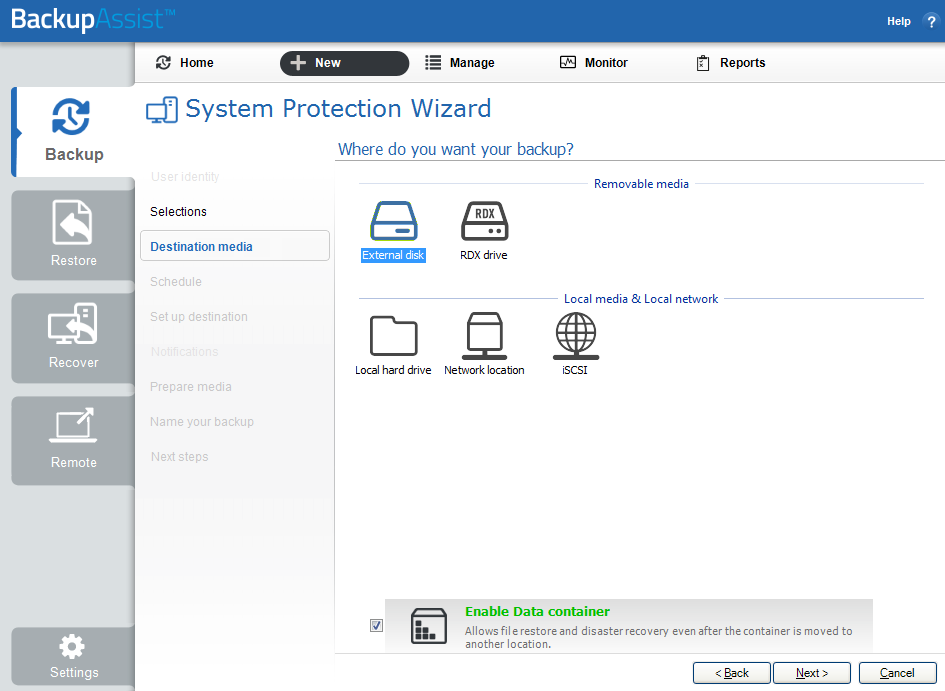
Data containers are only available for System Protection backups to the following Destination media: RDX drive, Network location, Local hard drive and External disk. The Data container will be mounted automatically by BackupAssist and appear as a local disk.
Creating a backup job
Destination media: This step will show the Enable Data container option.
The Data container will need to be manually selected for all destinations.
Set up destination: This step will include fields for the Data container’s settings.
The size of the Data container is set using this screen. It is important to review the settings to ensure they are appropriate because the size of a Data container cannot be changed once the backup job has run.. The Use all available space selection will use all available space, up to 2TB.
- For an RDX or External disk destination, Use all available space will be selected by default.
- For a Local hard drive and Network location, set the size manually by using the field provided, or select the Use all available space option. The destination path is where the Data container will be created. Backups will go inside the container.
You also need to provide the destination path - the location where the Data container will be created. The backups will go inside the container.
- The first time the backup job runs, it will create the Data container.
- The backup job will automatically mount the Data container and back up the data into the container each time the job runs.
Note: System Protection backups on RDX drives cannot be used to restore individual files unless Data containers are used. This applies to Windows Server 2008R2 and later.
Data container modifications
You can modify the size settings of a Data container, if the container does not exist. For example, if the backup job has not been run or if the container has been manually deleted.
To modify the size of the Data container:
- Select Manage from the Backup tab.
- Select the backup job from the list.
- Select Edit from the top menu.
- Select Destination and go down to Data container options:
- Container size (GB): Use the up and down arrows to set the size of the Data container.
- Use all available space: Tick this box and all available space on the destination device will be used by the Data container, up to 2TB.

Considerations
Sometimes restarting a service before a backup can help eliminate errors. Common services that benefit from restarting before backups are the Removable Storage Manager service and the Volume Shadow Copy service.
- All Data containers are called datacontainer.vhd
- Data containers can be located anywhere on the destination media.
- Only one Data container can be created per destination / path.
- The Data container will be created the first time the backup job runs.
- If separate backup jobs use the same location, the first job to run will create the Data container and the next job will see a container and use that one (it will not try to create another).
The Windows Settings
Incremental image backups must be manually enabled. To review this setting select: Settings tab > Windows settings > Enable image tracking.
With this option selected, Windows will flag any data that changes so that when the System Protection job runs, it doesn’t need to scan the data selection to know what has changed. This makes the backup a lot quicker, but there is a performance overhead between backups due to Windows keeping track of the changed data.

In some circumstances (changing the job’s settings or destination) a full backup may be required.
Performing a Restore or Recovery
Restores from a Data container
The restore process does not change for backups stored in Data containers. Each backup will provide a restore point, as defined by the backup schedule used.
- System Protection backups to Data containers will appear in the Restore Console.
- BackupAssist will automatically mount the Data container when the backup is selected.
Recovery using a Data container
A recovery is the process by which a computer is recovered after hardware has been replaced or an operating system failure has occurred, and your computer can no longer start itself.
To perform a recovery you need a bootable media to start your computer, and an image backup that the bootable media can use to recover your operating system, data and applications. System Protection can create the image backup used in the recovery process. If your System Protection backup is in a Data container, RecoverAssist can be used to mount the Data container as part of the recovery process.
To use a Data container in a Recovery:
- From the RecoverAssist menu, select Recover from backup on a local drive or Recover from a backup located on a network drive. The selection will depend on the backup media that the Data container is on.
- During the backup selection step, use the Search for Backups in Container button.
- Browse to the location of the Data container, and select it.
- RecoverAssist will mount it and the recovery process will proceed.

Manually mounting a Data container
Data containers are a destination option for System Protection backups. They overcome limitations associated with image backups and provide more flexibility.
BackupAssist automatically mounts Data containers when backups and restores are performed. However, there may be times when you want to do this manually. For example, if you want to check what is inside a Data container or have it available for a task.
To manually mount a Data container, follow these steps:
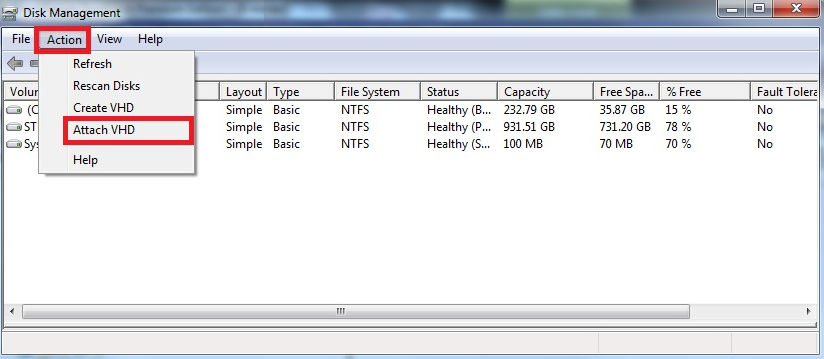
- Open Disk Management.
- Click the Start button.
- Type diskmgmt.msc into the Search Programs and Files text box.
- Press the Enter or click OK.
- Open Run from the Apps screen.
- Type diskmgmt.msc into the Search Programs and Files text box.
- Press the Enter key or click OK button.
- Select Action from the Disk Management menu.
- Select the menu option Attach VHD.
- Enter the path of the Data container that you want to mount, and Click Ok.
- You will now have a drive named BA_VHD_Container in your list of available drives.
- Right click BA_VHD_Container and select Change Drive Letter and Paths, and Select Add.
- Select a drive letter for the Data container, using the drop down box, and Select OK.
For Windows Server 2008 R2, SBS 2011 and Windows 7:
For Windows Server 2012 and Windows 8:
The Disk Management console will open.
You can now browse the Data container using Windows Explorer.

