Backup Notifications
BackupAssist Version 4
1. Introduction and Overview
1.1 Types of notification in BackupAssist
BackupAssist supports three types of user notification: reminder, report and maintenance. These notifications are designed to help ensure the integrity of your backup strategy by reminding you of necessary media changes, informing you of problems with your backups, and notifying you of any other tasks that need to be performed in order to keep your backups running smoothly.
- Reminder notifications - If your backup job requires you to regularly change tapes, disks or drives, BackupAssist can remind you to do it.
- Report notifications - Once a backup has finished BackupAssist can inform you of the result. You can choose to receive all backup reports, or only reports that have failed.
- Maintenance notifications - Some devices need regular maintenance: Tape drives need cleaning, hard drives need defragmentation, and so on. Maintenance notifications can remind you to perform these tasks at user-scheduled times.
1.2 Methods for sending notifications
Notifications can be sent via email, network broadcast or sent to a printer.
· Email - BackupAssist can use your email server to send notifications to any number of recipients. Emails can be sent in HTML format, plain text, or as a one line summary. Email server settings must be entered before email notifications can be created and (see section 2.2).
· Net send - BackupAssist can send messages to a computer or user directly using a network broadcast. Before using this feature make sure that the machine running BackupAssist and the recipient machine have the Messenger service enabled by going to Control Panel > Administrative Tools > Services.
- Printer - Reports can be sent to a printer to provide you with a hardcopy of the backup result. To send reports, the printer must be set up in Windows under Control Panel > Printers & Faxes.
2. Adding Notifications
2.1 Setting up your mail server in BackupAssist
Before you can send any notifications via email you will need to enter your email server settings into BackupAssist. These settings can be accessed by going to the Settings menu and selecting 'Email server settings' or through the Settings tab.
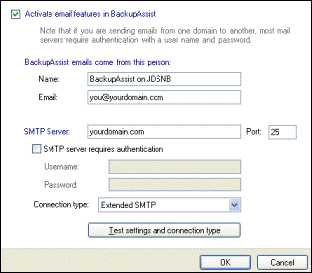
1. Check the 'Activate email features in BackupAssist' checkbox.
2. Under the section titled 'BackupAssist emails come from this person:' enter your name and email address, or the name and email address of the person who will be responsible for backup maintenance. Test emails will also be sent to this address.
3. Enter the name of your SMTP Server.
4. Port 25 is the default port for outgoing email. Make sure that this port is not being blocked by any security or firewall software that may be installed.
5. Enter the username and password for your SMTP server if it requires authentication.
6. Click on the 'Test settings and connection type' button. This will attempt to send a number of plain text emails to the email address you entered above. BackupAssist will then suggest a connection type based on the test results.
7. Click 'OK'.
2.2 Adding notifications - the basics
a) Click on edit in the top menu and select the job that you want to add a notification to:

b) Click on the 'notifications' link to the left:
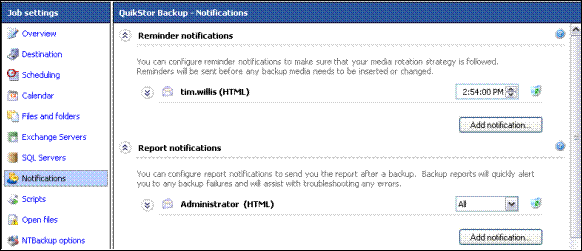
c) Click on the blue and white question mark icon to the right of the screen to access detailed instructions on adding notifications should you need help; otherwise click 'Add notification' under the relevant section (reminder, report, or maintenance):

3. Recipients
3.1 Managing recipients
BackupAssist version 4 has a new feature designed to make managing the recipients of notifications easier. In the Settings tab of the main console, you will find the 'Email address list' and the 'Net send address list'. Changes made to these lists affect all notifications configured in all of your backup jobs.
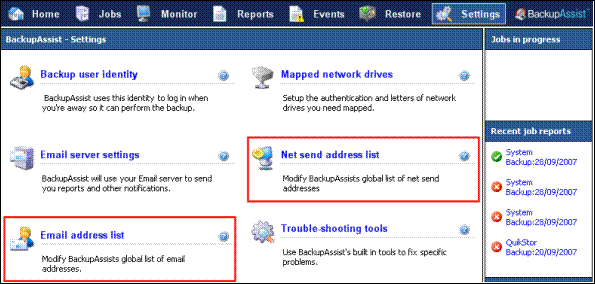
Use these lists to easily change the recipients of your notifications. For example, if Ann, with email address Ann@Acorp.com, is currently receiving emailed reports from all of your jobs, but is then promoted and replaced by Bob, who has a different email address Bob@Acorp.com, you can access the email list and use the edit button to change Ann's email address to Bob's; each notification across all jobs will be updated automatically.
If you need to remove a net send or email address from your notifications, deleting the address from the appropriate list will remove that address from all notifications as well.
3.1 Email address list
BackupAssist keeps a global list of email addresses that you have added to your jobs. This list can be found on the settings tab, or by going to the settings menu and selecting 'Email address list'. On this screen you can add new email addresses and remove or edit existing email addresses.
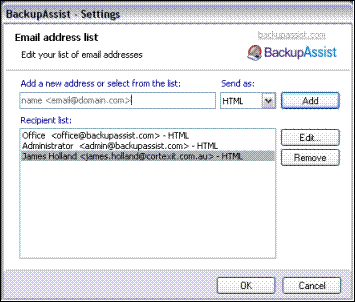
Note : changes made in this screen will affect all of your jobs. For example, if you have added the same email address to three different jobs, then deleting that address from the list will result in the recipient being removed from all three jobs.
This section also allows you to change the way notifications are sent to each address. There are three different methods available:
- HTML - this is the default. Reports will be sent in the same HTML format that you see when viewing reports through the console. Some mail servers, however, will block HTML emails.
- Plain - this will send notifications in plain text format. Reports in plain text format are not as easy to read, but the size of the email will be much smaller and can help when using a slow internet connection. Also, mail servers have fewer issues with plain text emails.
- Summary - only shows the subject line of the email without any content. The subject line can be customized to give a short message, but by default will tell you whether the backup succeeded or failed. This setting is useful when sending notifications to portable devices with limited bandwidth and viewing area.
3.2 Net send address list
The net send address list stores all the net send addresses that have been added in BackupAssist. This screen can be accessed through the settings tab, or by clicking on 'Settings' in the menu and selecting 'Net send address list'.
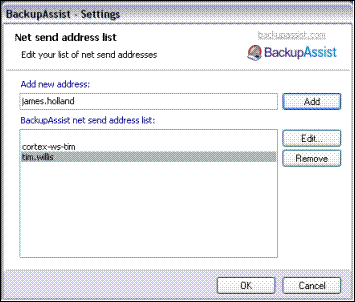
In the net send address list screen you can remove addresses, or change existing addresses.
Note
: again, removing or editing an address in this list will be automatically reflected in all jobs that use the address.
3.3 Printer recipients
There is no address list for printers. The list of printers available in BackupAssist matches the printers that are available in the Windows Control Panel > Printers and Faxes section.
4. Troubleshooting
4.1 Email troubleshooting
If you are not receiving the email notifications you have set up, first make sure that the email server settings have been entered as shown in section 2.2. In the email server settings, make sure that the 'From' email address is set to an email account that you have access to and then click the 'Test settings and connection type' button at the bottom of the screen. This will send a number of plain text emails to that address. Please check the address to see if any of the emails were received. If they were, it is possible that your system rejects HTML based emails. If that is the case, you can either change the security settings for your mail client, or you can go to the email address list, change the type of notification from HTML to Plain text.
If you do not receive plain text emails, please make sure that the 'From' email address has been white-listed in your email client. Some email servers incorrectly identify BackupAssist reports as spam and refuse to send them. If you have a spam folder in your email client, please also check this.
4.2 Net send troubleshooting
If you are not receiving your network broadcast notifications first make sure that the 'Messenger' service is enabled on the machine with BackupAssist installed and the machine that is supposed to receive the notifications. Go to Control Panel > Administrative Tools > Services, and locate the Messenger service; right click on it and select 'Properties', and make sure that the 'Startup type' is set to 'manual' or 'automatic'.
If you are still not receiving notifications, try sending to the IP address of the recipient's machine (for example, 192.168.x.x). The IP address can be obtained by going to the recipient machine and typing 'ipconfig' into a command line prompt window.
4.3 Printer troubleshooting
Make sure that the printer you want to send your report to has been added in Control Panel > Printers and Faxes section.
Reminders and Maintenance notifications cannot be sent to printers as these sorts of notifications are typically designed to alert a user to make a prompt response.

 Belgium
 Canada
 Germany
 Italy
Italy France
 Spain
Spain United Kingdom

