Exchange mailbox backup and restore
BackupAssist Version 6
1. Introduction and Overview
1.1 What does the Exchange Mailbox Add-on do?
The BackupAssist Exchange Mailbox Add-on is used to achieve brick-level backups of your Microsoft Exchange Server. The add-on extracts Exchange Server mail data to separate .PST files, which can be read using Microsoft Outlook, or re- imported to your Exchange Server to retrieve mail items. The extracted .PST files can be copied to your intended backup device: tape, CD/DVD, hard disk, and so on, for redundancy and permanent storage offsite.
A separate .PST file is created for each Exchange user's mailbox, making for simple and rapid restoration of user's individual or group emails, calendars, tasks, notes, contacts or entire mailboxes. As mailboxes are stored in Microsoft's PST format, they can be easily opened with Outlook and are not locked into any vendor's proprietary formats.
The add-on provides automatic grouping of emails by date, allowing you to sort your mail into separate folders by year, quarter, or month. This is especially useful for compliance and legal scenarios where you may be required to produce separate archives of your mail data for specific time periods.
The best part of the Exchange Mailbox Add-on? It's all automated for you. Input your mail server settings, configure a few simple options, perform an initial export of your mail data and BackupAssist will take care of the rest, automatically appending incremental backups of new mail data each day, as specified within your backup schedule.
1.2 Who needs the Exchange Mailbox Add-on?
The following table outlines where the add-on is best utilized:
|
Where to use the add-on |
Where not to use the add-on |
|
· To restore individual mailbox items that have been accidentally changed or deleted. · To bulk-restore messages, with filtering options such as date, mailbox, message subject, etc. · To retain a historical library of your emails, which can also be stored offsite or viewed offline. |
· To restore a complete exchange server. Instead, restore the entire Information Store from your main Exchange backup (see the Exchange Server Backup and Restore whitepaper on our website). |
|
Supported platforms for this add-on: Microsoft Exchange Server 2000, 2003, 2007, and 2010 |
|
1.3 Comparison matrix
The following table highlights the different configurations of BackupAssist that are available:
|
BackupAssist |
BackupAssist + Exchange Mailbox Add-on |
|
|
Information Store Backup |
||
|
Individual Mailboxes |
Public folders
|
|
| Restore options |
|
|
1.4 Key features and benefits
The following table highlights the key features and benefits of the Exchange Mailbox add-on:
| Feature | Benefits |
|---|---|
| Brick-level backup of Exchange | Achieve automated brick-level backup of Exchange data to backup user's individual mailboxes. |
| Smarter implementation makes daily backups fast | After an initial export of existing mail data to separate PST files (one per mailbox), BackupAssist will automatically schedule daily exports that intelligently merge or append only new mail data into these files. This is similar to a daily incremental and is much faster than traditional backup methods. |
| Simple and rapid restoration of Exchange data | A separate .PST file is created for each Exchange user's mailbox, making for simple and rapid restoration of user's individual or group emails, calendars, tasks, notes, contacts or entire mailboxes. |
| No proprietary formats | PST is a well recognized file format, and users can open the files easily in Outlook. Email data is not locked within a proprietary format. |
| Easy grouping and storage of emails | PST files of mail data can be easily stored within separate folders and sorted by either year, quarter or month. This is useful for compliance and in legal scenarios where forensic archiving is required. |
| Extra protection for deleted items | Mailbox backups go beyond the standard snapshot backup. Each separate PST file is the cumulative total of all emails sent and received over a given time period. This prevents problems arising when a user discovers they deleted an email weeks or even months later. |
| External storage of mail data | Exchange mailbox PST files can be backed up to External Storage media such as tape, optical, or hard disk. |
| Archive mail data to writeable media or FTP | PST files can be written to CD/DVDs or transferred to remote servers, such as a FTP server or NAS device for permanent offsite storage. |
| A range of recovery options |
|
| Works on 32 bit and 64 bit machines | The BackupAssist solution can be installed on 64 or 32 bit machines, giving you the same simple setup no matter what version of Exchange or Windows Server you‘re running. |
| Public Folder backup | BackupAssist can backup Public Folders to their own PST file. |
2. How the Exchange Mailbox Add-on Works
2.1 How the export of mail data is achieved
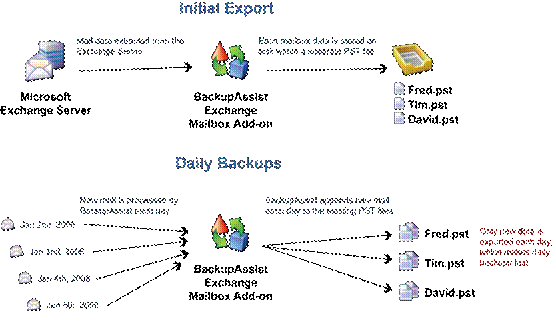
The Exchange Mailbox add-on performs brick-level backups of users' mailboxes to separate PST files. We recommended that you perform an initial manual export of your selected mailboxes (see section 4.3). After this export, BackupAssist will merge new mail data to existing PST files according to your backup schedule.
The below diagram provides an overview of how the add-on works:
|
2.2 The grouping of mailbox data
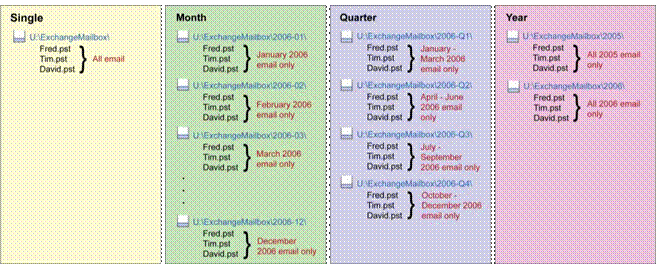
A grouping method can be selected to determine how your mail data is stored on disk, with different options to store mail data within separate folders according to different time periods. PST files can be grouped by either month, quarter, year, or simply stored as a single set. The grouping method option makes it easier to locate mail data from specific dates.
The following diagram illustrates how mail data is stored:
2.3 More than just a simple 'snapshot' backup of mailboxes
Each separate PST file for each user is the cumulative total of all emails sent or received over a given time period, and not just a ‗snapshot' of each individual user's mailbox at a particular point in time. Doing this prevents problems when a user requires an email that they deleted weeks or months ago, but only has a recent backup of their mailbox that does not include the deleted item.
For example, given these events:
1. An email is received on the 1st of May 2006.
2. The user deletes this email on the 3rd of May 2006.
3. On the 5th of June 2006, the user needs to retrieve this previously deleted email.
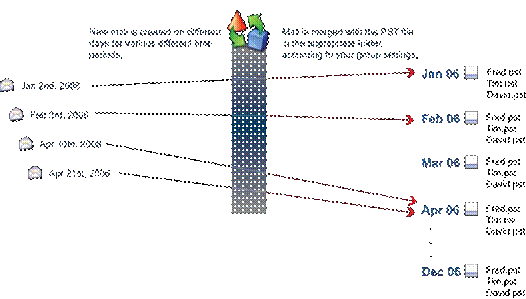
With BackupAssist's Exchange Mailbox add-on, the original email would be backed up in the relevant year, quarter, month, or single folder, depending on your group settings, as a separate PST file on the night of the 1st of May. Even though the user deleted the email on the 3rd of May, the PST file would still contain the original message. When you need to recover the email, you can open the relevant user's PST file and the original email will be available. The following diagram demonstrates how the sorting process works, assuming that the mail data is being sorted by month:
|
2.4 Benefits over PowerShell scripts (Exchange 2007)
|
PowerShell Limitation / Requirement |
BackupAssist overcomes this… |
|
Needs to be run on a separate 32-bit machine; cannot be run on the Exchange Server |
Can be run on a 64-bit or 32-bit machine, and can be run on the Exchange Server. |
|
Requires the Exchange Server 2007 Management Tools (32-bit) |
No management tools required. |
|
Requires Outlook 2003 SP2 or Outlook 2007 |
BackupAssist does not require Outlook and functions flawlessly without it. However, if Outlook is installed, Unicode PST features are available. |
|
Requires PowerShell scripting |
Fully automatic assignment of permissions and exporting of mailboxes, all in a simple UI. |
|
Requires manual scheduling |
Automatic scheduling thanks to BackupAssist scheduler. |
|
No automatic reporting |
Automatic reporting keeps admin informed of results. |
|
Does not support public folders |
BackupAssist supports public folder exporting to PST! |
2.5 Benefits over standard ExMerge scripts (Exchange 2003)
The Exchange Mailbox add-on offers a number of key benefits over standard Microsoft ExMerge scripts:
- BackupAssist will manage the mailbox security rights, so no further administrative work is required.
BackupAssist will automate the export process in accordance to your grouping settings, automatically merging new emails into the appropriate PST file(s).- When you choose to backup all mailboxes, any new users' mailboxes will be backed up without you needing to update your settings or scripts manually.
- Disabled or hidden Exchange users can be deselected so that they are never backed up.
3. Requirements / Configurations
3.1 PST formats
The following table outlines the different methods BackupAssist supports for creating PST backups of Exchange mailboxes, together with the advantages / disadvantages of each PST format, and the required applications that must be installed to perform mailbox backups. Each advantage / disadvantage and requirement has also been numbered, and a more detailed explanation is provided below.
|
PST format |
Advantages / Disadvantages |
Requirements |
|
ANSI PST using Exchange |
Advantages: Recommended format for Exchange 2003 Servers (1) Public folder backup support (2) Disadvantages: O 2GB file size limit on PST files (3) |
Exchange Server MAPI Client (1) OR Exchange 2003 Management tools (2) |
|
ANSI PST using Exmerge |
Advantages: Recommended format for Exchange 2003 Servers (1) Legacy support (4) Disadvantages: No Public folder backup support (2) 2GB file size limit on PST files (3) |
Exchange 2003 Management tools (2) AND Microsoft Exmerge (3) |
|
Unicode PST using Outlook |
Advantages: Microsoft recommended format for Exchange 2007 /2010 Servers (1) Public folder backup support (2) No 2GB file size limit on PST files (3) International character support (5) Disadvantages: Requires Microsoft Outlook (6) |
Microsoft Outlook (4) Note : Please review the following Microsoft article before using the Unicode functionality http://support.microsoft.com/ kb/266418 |
Advantages / disadvantages explained
( 1 ) Recommended format
· ANSI PST is the recommended format when backing up mailboxes from Exchange 2003 servers.
· Unicode PST is the recommended format when backing up mailboxes from Exchange 2007/2010 servers.
( 2 ) Public folder backup support
Exchange Server public folders are publicly accessible repositories that store email messages, calendars, contacts, and so on, that everyone on the network can access through Outlook. If public folder backups are supported with your mailbox backup configuration you can configure BackupAssist to backup public folders together with the backup of each user's private mailbox. The Public Folder backup will be stored in your Exchange mailbox backup directory as a PST file named _PublicFolders_.pst.
- Note: if you have selected ANSI PST using Exmerge as your PST format you will not be able to backup
public folders. Exmerge will only extract mail data from private mailboxes.
( 3 ) 2GB file size limit on PST files
PST files in the American National Standards Institute (ANSI) format have a file size limit of 2 gigabytes (GB). Once a PST file grows beyond 2GB in size, the file will become corrupt and unreadable. See Microsoft article Q288283 and Q830336 for more details.
To overcome this limitation, you can choose to group your mail data by selecting a grouping method within the Exchange tab of BackupAssist. This option will act to store mail data within separate folders for each month, with each separate PST file being much smaller as it only contains mail data from a single month. Alternatively, you can store your PST mailbox backups in the Unicode format, which does not have any file size limit.
( 4 ) Legacy support
Support for the Microsoft Mailbox Merge Wizard (Exmerge) is included for backwards compatibility with previous versions of BackupAssist only; new features such as Public folder backup support are not available with this setting. Users familiar with Exmerge can continue using this setting to maintain compatibility with their current environment.
( 5 ) International character support
PST files in Unicode format provide support for international characters, including non-Latin alphabets.
( 6 ) Requires Microsoft Outlook
The machine running BackupAssist must have Microsoft Outlook installed in to create PST files in Unicode format.
Requirements explained
( 1 ) Exchange Server MAPI client
The Exchange Messaging API (MAPI) client provides a COM-like API that BackupAssist uses to access to the contents of messaging stores on an Exchange Server. BackupAssist provides a built-in facility to automatically install the MAPI client, but this can also be downloaded and installed manually from Microsoft.The Exchange MAPI client can be installed on nearly any Windows operating system, but cannot be installed if Microsoft Outlook is already present on your server. If you are running Windows Vista (32-bit or 64-bit) or a 64-bit operating system, such as Server 2008
or SBS 2008, you must either install the Exchange MAPI to backup to PST in ANSI format, or install Microsoft
Outlook to backup to PST in Unicode format. The latest version of Exchange 2007 MAPI can be obtained using the
―Upgrade feature in the BackupAssist Console. (Note that the version of MAPI that comes with the 2003
Management tools cannot be upgraded and does not support backup of Exchange 2010.)
( 2 ) Exchange 2003 Management tools
The Exchange Server 2003 Management tools may be installed on the machine running BackupAssist if you want BackupAssist to create mailbox backups in ANSI PST format using either Exchange or Exmerge. The Exchange Server 2003 Management tools can be installed using the Exchange Server 2003 installation disc.
- Note : The Exchange 2003 Management Tools cannot be installed on Windows Vista (32-bit or 64-bit) or any
64-bit operating system, such as Server 2008 or SBS 2008.
( 3 ) Microsoft Exmerge
The Microsoft Mailbox Merge Wizard (Exmerge) must be installed on the machine running BackupAssist if you want BackupAssist to create PST mailbox backups in ANSI format using Exmerge. BackupAssist provides a facility for automatically downloading and installing Exmerge on your server.
- Note : the Exchange Server 2003 Management tools must be installed before Exmerge can be installed.
( 4 ) Microsoft Outlook
Microsoft Outlook (any modern 32bit version of Outlook - 2003, 2007 or 2010 [64bit versions not supported]), must be installed on the machine running BackupAssist if you want to create PST mailbox backups in U©niCcoodrteexfoI.Trm. 2a0t0.1-2007
3.2 Available configurations
The following table outlines the various Exchange Mailbox Backup configurations possible with BackupAssist v5, including the options that each configuration supports:
|
Configuration |
Options supported |
|
ANSI PST using Exchange |
with Exchange MAPI client installed |
|
Operating systems supported: 32-bit and 64-bit versions of Windows XP, Server / SBS 2003, Server / SBS 2008. Public folder backup: Setting mailbox rights on Exchange 2003: Setting mailbox rights on Exchange 2007/2010 : * |
|
|
with Exchange 2003 Management Tools installed |
|
|
Operating systems supported: 32-bit versions of Windows 2000, XP, Server / SBS 2003. Public folder backup support: Automatically setting mailbox rights on Exchange 2003: Automatically setting mailbox rights on Exchange 2007/2010: * |
|
|
ANSI PST using Exmerge |
with Exchange 2003 Management Tools and Exmerge installed |
|
Operating systems supported: 32-bit versions of Windows 2000, XP, Server / SBS 2003. Public folder backup support: Automatically setting mailbox rights on Exchange 2003: Automatically setting mailbox rights on Exchange 2007/2010: * |
|
|
Unicode PST using Outlook |
with Microsoft Outlook 2003 / 2007 / 2010 installed |
|
Operating systems supported: 32-bit and 64-bit versions of Windows 2000, XP, Server 2003, SBS2003, Vista, Server 2008, and SBS 2008. Public folder backup support: Automatically setting mailbox rights on Exchange 2003: with Exchange 2003 Management Tools installed * Automatically setting mailbox rights on Exchange 2007/2010: * |
* Most Exchange 2007 and Exchange 2010 setups do not require you to enable the option to set mailbox rights automatically for mailbox backups to run correctly. This option should only be enabled when advised by the BackupAssist Technical Support team.
- Note: you cannot install both Exchange 2003 Management Tools and Exchange 2007/2010 Management Tools on the same machine; for Unicode PST the ―setting mailbox rights‖ option that is available depends on the version of Exchange Management Tools that is installed (we suggest installing the 2003 Management Tools if backing up Exchange 2003 servers).
4. Setup instructions
The following section provides a set of instructions for setting up Exchange Mailbox backups using BackupAssist's Exchange Mailbox Add-on. The instructions provided have been separated according to the operating system that BackupAssist is installed on, as the mailbox backup settings available depend on the operating system you are using.
- Note : for users with existing mailbox backup jobs who have upgraded BackupAssist to a version that has the new Exchange Mailbox Backup engine, their jobs will continue to use Exmerge to backup Exchange mailboxes, and therefore store PSTs in the ANSI format. To change this setting, access the Destination tab of your job.
4.1 Instructions for Windows Vista, 7 Server 2008/R2, and SBS 2008
The following instructions are for users who have installed BackupAssist on Windows Vista, 7, Server 2008, or SBS 2008. To create an Exchange mailbox backup job:
1. Launch BackupAssist, click File > New backup job and select Exchange Mailbox under ‗Application backup'.
- Note : Exchange mailbox and public folder backups can be embedded in all BackupAssist jobs via the
'Exchange Servers' tab. Mailbox and public folder backups are executed as part of a backup run, and included in your main file selections, which are written to your backup destination.
2. Select an appropriate schedule and click Next.
3. Input the Directory path where you would like your Exchange Mailbox backups to be stored, and choose a
Grouping method from the available drop-down menu.
4. On the same screen, choose an appropriate PST format as described below:
Note : selecting an appropriate PST format is important, as PST files cannot be converted from one format to the other. For more information about each PST file format refer to section 3.1.
ANSI PST using Exchange: |
To use this option you must have the Exchange MAPI client installed on your machine. Note that the MAPI client cannot be installed if Microsoft Outlook is already present on the machine. So to store mailbox backups in ANSI format you need to make sure that a) Microsoft Outlook is not installed; and b) the Exchange MAPI client is installed. BackupAssist provides a facility for automatically installing the Exchange MAPI client: 1. Select the ANSI PST using Exchange radio button and then click the blue Install help link below: 
2. A new window should appear. Click the Install button under Microsoft Exchange Server MAPI Client (and CDO) 1.2.1 to install the MAPI client: 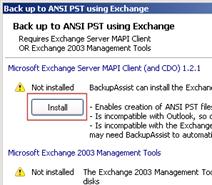
3. BackupAssist will then download the Exchange MAPI client and install it on your machine. |
ANSI PST using Exmerge: |
This option is not available on Windows Vista, Server 2008, or SBS 2008, as Exmerge requires the Exchange Server 2003 Management tools, which cannot be installed on any of these operating systems. |
|
Unicode PST using Outlook (recommended) |
To use this option you must have Microsoft Outlook 2003 or later installed on your machine. Note that you should not install Microsoft Outlook if the Exchange MAPI client is already present on the machine. So to store mailbox backups in Unicode format you need to make sure that a) the Exchange MAPI client is not installed; and b) Microsoft Outlook 2003 or later is installed. |
5. On the same screen, choose whether BackupAssist should attempt to automatically set mailbox rights on your Exchange server using the available checkboxes:
- For 2003 servers: This option is not available on Windows Vista, Server 2008, or SBS 2008, as it requires the Exchange Server 2003 Management tools, which cannot be installed on any of these operating systems.
- For 2007/2010 servers: Most Exchange 2007 and Exchange 2010 setups do not require this option to be enabled in order for mailbox backups to run successfully. This option should only be enabled when advised by the BackupAssist Technical Support team, typically when the Backup User Identity is not an Exchange Domain Server Administrator.
6. Click Next and then Add Exchange Server to select the Exchange server(s) you want to backup mailboxes from.
7. Check the Backup individual mailboxes checkbox for each Exchange server that you want to backup individual mailboxes from.
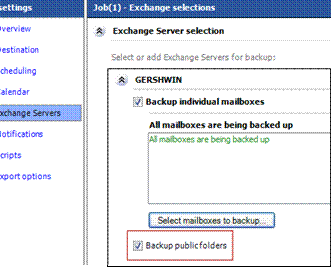
8. Check the Backup public folders checkbox if you also wish to backup your Exchange server public folders each time a mailbox backup runs:
9. Click Next, name your backup job, and then click Finish.
10. To access mailbox backup settings for this job click Edit and select the appropriate job. From the left:
- Click Destination to change the mailbox directory path, grouping method, and PST file format.
- Click Exchange Servers to configure which Exchange servers to backup mailboxes from, and whether public folders should be backed up.
- Click Export options to configure more advanced mailbox backup options.
4.2 Instructions for Windows 2000, XP, Server 2003, SBS 2003
The following instructions are for users who have installed BackupAssist on Windows 2000, XP, Server 2003, or SBS 2003. To create an Exchange mailbox backup job:
1. Launch BackupAssist, click File > New backup job and select Exchange Mailbox under ‗Application backup'.
2. Select an appropriate schedule and click Next.
3. Input the Directory path where you would like your Exchange Mailbox backups to be stored, and choose a
Grouping method from the available drop-down menu.
4. On the same screen, choose an appropriate PST format as described below:
Note: selecting an appropriate PST format is important, as a PST file in one format cannot be converted to the other. For more information about each PST file format refer to section 3.1.
ANSI PST using Exchange: |
To use this option you must have either the Exchange MAPI client OR the Exchange 2003 Management Tools installed on your machine. Note the following:
If installing the Exchange 2003 Management Tools is not possible, BackupAssist can automatically install the Exchange MAPI client for you as follows: i. Select the ANSI PST using Exchange radio button and then click the blue Install help link below: 
ii. A new window should appear. Click the Install button under Microsoft Exchange Server MAPI Client (and CDO) 1.2.1 to install the MAPI client: 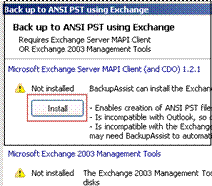
iii. BackupAssist will then download the Exchange MAPI client and install it on your machine. |
|
ANSI PST using Exmerge: |
To use this option you must have both the Exchange 2003 Management Tools and Exmerge installed on your machine. Note: if the Exchange MAPI client is already present on your machine you will need to first uninstall it before being able to install the Exchange 2003 Management Tools. See the Microsoft TechNet article ‗How to Install the Exchange System Management Tools' for instructions on how to install the Exchange 2003 Management Tools. Once the management tools are installed BackupAssist can automatically install Exmerge for you as follows: i. Select the ANSI PST using Exmerge radio button and then click the Install button below: 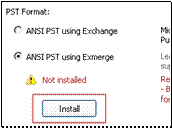
ii. BackupAssist will then download Exmerge and install it on your machine. |
|
Unicode PST using Outlook (recommended): |
To use this option you must have Microsoft Outlook 2003 or later installed on your machine. Note that you cannot install Microsoft Outlook if the Exchange MAPI client is already present on the machine. So to store mailbox backups in Unicode format you need to make sure that a) the Exchange MAPI client is not installed; and b) Microsoft Outlook 2003 or later is installed. |
5. On the same screen, choose whether BackupAssist should attempt to automatically set mailbox rights on your Exchange server using the available checkboxes:
- For 2003 servers:
This option is not available on Windows Vista, Server 2008, or SBS 2008, as it requires the Exchange Server 2003 Management tools, which cannot be installed on any of these operating systems.
- For 2007/2010 servers:
Select this option if you want BackupAssist to grant the backup user identity (Settings > Backup user identity) access to the Exchange mailboxes that have been selected for backup. This option is recommended if you are experiencing access errors with mailbox backups on an Exchange 2007/2010 server.
To enable this option you must have the Exchange 2007 or 2010 Management Tools installed on the machine running BackupAssist. See the Microsoft TechNet article ‗ How to Install Exchange 2007 Management Tools' or Install the Exchange 2010 Management Tools' for instructions.
Note: you cannot install both the Exchange 2007/2010 and the Exchange 2003 Management Tools on the same machine. If you are backing up mailboxes from both types of Exchange Server we recommend that you install just the Exchange 2003 Management Tools.
6. Click Next and then Add Exchange Server to select the Exchange server(s) you want to backup mailboxes from.
7. Check the Backup individual mailboxes checkbox for each Exchange server that you want to backup individual mailboxes from.
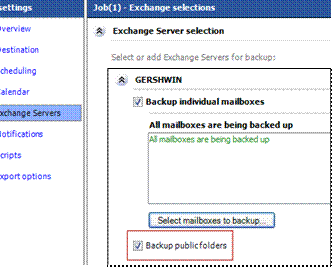
8. Check the Backup public folders checkbox if you also wish to backup your Exchange server public folders each time a mailbox backup runs. The option to backup runs Public folders will be disabled if you selected ANSI PST using Exmerge as your PST format in step 4.
9. Click Next, name your backup job, and then click Finish.
10. Click Next, name your backup job, and then click Finish.
11. To access mailbox backup settings for this job click Edit and select the appropriate job. From the left:
- Click Destination to change the mailbox directory path, grouping method, and PST file format.
- Click Exchange Servers to configure which Exchange servers to backup mailboxes from, and whether public folders should be backed up.
- Click Export options to configure more advanced mailbox backup options.
4.3 Performing a manual export of Exchange mailbox data
After you have created your backup job we recommended that you perform a manual export of the selected mailboxes. Depending on the size of your Exchange server and the mailboxes you have selected to backup, the initial export may take some time to complete, which is why we recommend performing it manually, at a time when the server is not being heavily utilized. Refer to section 2.1 for more information about the initial export.
To perform a manual export of your mailboxes:
1. Select Exchange Servers from the left menu.
2. Scroll to the Mailbox export status section and click Perform manual export. A new window will appear where you can select what periods of mail data you would like to export. The periods available for selection are sorted according to the grouping method defined.
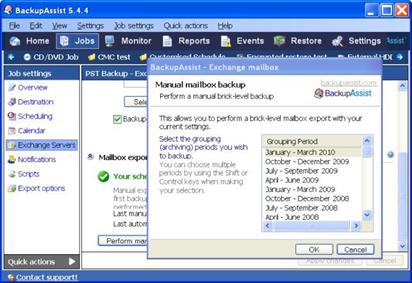
- Note: if a grouping period is not selected, e-mails within that date range will not be backed up during the manual export. By default, the latest grouping period (e.g. January-March 2010) is the only period selected. If you want to export multiple grouping periods, hold down the SHIFT key and select each individual grouping period. To backup all mailbox data on your Exchange Server you will need to select all of the available grouping periods; this can take a very long time to complete depending on the size of your Exchange Server.
3. After you have selected the appropriate periods click OK and you will be taken to the Monitor Window where
BackupAssist will begin the export of mailbox data to PST files.
4. If the mailbox export fails click Report at the bottom of the Monitor Window to determine what errors occurred.
5. Once you have completed a successful export of all mailbox data, BackupAssist will keep PST files up to date by automatically scheduling exports each time your backup job is scheduled to run. New mail data is merged into the existing PST files on disk.
5. Restoring Mailbox data
5.1 Restore options available
There are three options available for restoring individual mailboxes and individual mail items: (1) using the BackupAssist Restore Console; (2) manually opening PST files in Outlook; and (3) mass-importing items with the Microsoft Mailbox Merge Wizard.
Using the BackupAssist Restore Console
Use the BackupAssist Restore Console to easily restore both mailboxes and public folders from a specific date range.
Manually opening PST files in Outlook
Use this method for simple scenarios where a user has deleted one or more items, and needs to retrieve the information quickly.
Using the Microsoft Mailbox Merge Wizard (Exchange 2003)
Use this for when you need an automated way of importing data, such as:
- Importing multiple mailboxes.
- Importing messages using filters - such as between two dates, subject lines, attachments, folders, etc.
For example: Exchange corruption occurs, and a user has lost their entire ‗Sent Items' folder.
5.2 Using the BackupAssist Restore Console
To restore Exchange mailboxes and public folders using the BackupAssist Restore Console:
1. Click Restore in the navigation bar and choose BackupAssist Restore Console.
2. Click Load all known backups to load all backup catalogues located in the BackupAssist settings folder. Alternatively use the Browse option to locate the backup set from which you want to restore.
3. Choose the job that corresponds to the backup from which you want to restore.
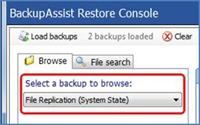
4. Use the calendar to select the date of the backup from which you want to restore (backups are marked in bold)
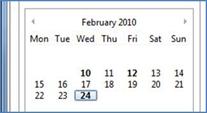
5. Optional: if multiple backups were created on the same day a Time drop-down menu will appear below the calendar, which you can use this menu to select the appropriate backup.
6. Use the middle pane and right-most pane to expand the loaded backup set and select the data you wish to restore.
- Please note : mailboxes must be restored independently of other data. If you need to restore other data, such as files, applications or the System State, as well as Exchange mailbox data you will need to complete this as a separate restore task.
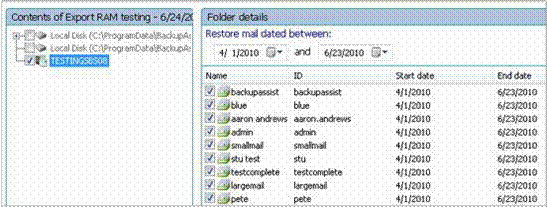
7. If any mailbox or public folder backups are included within the loaded backup set, named Exchange Server(s) will appear in the middle pane. If you select an Exchange Server from the tree a list of mailboxes available for restore will appear in the right-most pane. From here you can choose which mailboxes to restore, as well as the date range of the mail items that you want to recover (for example you might want to retrieve all of jan.doe's mail data from July 2010).
8. Once you have selected the data you wish to restore click the Restore to button to the bottom right of the window.

9. In the middle drop-down menu you can choose where you want to restore your mailbox and public folders to:
- Original location : the mailboxes selected for restore will be copied directly back into the Exchange Server that they were originally exported from.
- Alternate server : the mailboxes selected for restore will be copied to an alternate Exchange Server of your choosing. Click the Select button to choose an alternate server to restore to. If no Exchange Servers are detected, click the Select button to search for one.
- Alternate path : all mailboxes will be restored as separate PST files to a single folder of your choosing. you can have all your mailbox PST backups. You can then open up any of the PST files extracted with Outlook and drag- and-drop the required mail items back a the user's live mailbox. This option is useful if your PST backups are distributed across multiple folders (e.g. you used a grouping period or modified your mailbox backup directory between backup runs).
If you choose to restore your mailboxes to either their original location or an alternate server, you can click the Configure restore button located under 'Restore options' to change how mailboxes are restored. Here you can individually specify which mailbox each PST mailbox backup should overwrite in your Exchange Server. This is useful if an Exchange Server mailbox has been renamed since being backed up, or if you want to overwrite one mailbox with another.
10.Once you have selected where to restore your data click Restore to the bottom right of the window. Once the restore is complete the result will be printed to the left of the window. Click the blue link to view the restore report.
5.3 Manually opening PST files in Outlook
1. Copy the appropriate PST file to a location that is accessible to the relevant user's computer.
2. For example: copy the PST temporarily to ‗Users Shared Folders', another network share or an external hard drive:
3. From the relevant user's computer, run Microsoft Outlook and select File menu > Open > Outlook Data File:
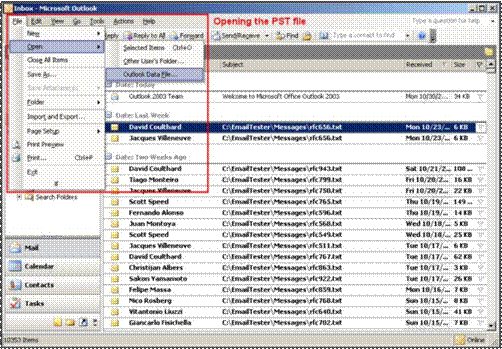

4. Browse for the PST file in the location it was copied to in Step 1:
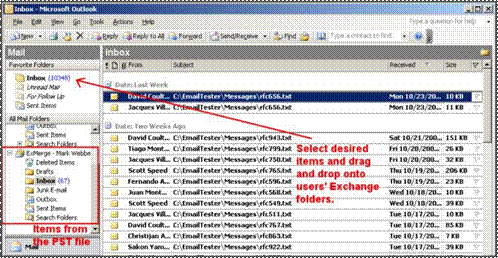
5. From this PST file you can view the email messages and drag-and-drop the mail items back into the original folders:
5.4 Using the Microsoft Mailbox Merge Wizard to mass-import items (Exchange 2003)
1. Run the Exmerge.exe program from the /bin folder in your Exchange Server installation directory. This program was downloaded and installed for use with the BackupAssist Exchange Mailbox Add-on and gives you powerful options for importing lost mail data.
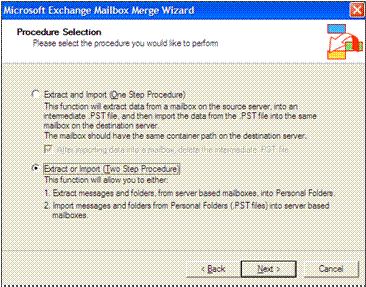
2. When the Wizard first runs, choose Extract or Import (Two Step Procedure):
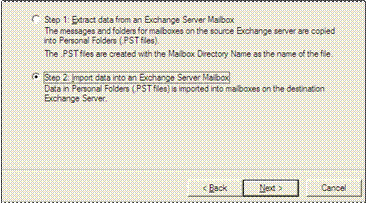
3. Now choose Step 2 to import your mailbox data back into your Exchange Server:
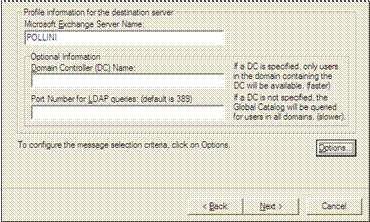
4. Input the details of your Exchange Server:
5. To bring up advanced options such as filtering, click Options on the right hand side of the window.
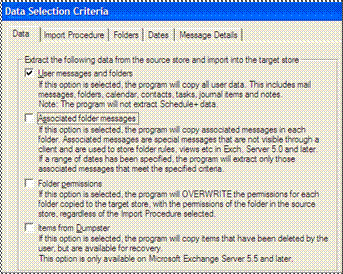
6. On the Data tab you can define what types of mail data you want to import from your Mailboxes:
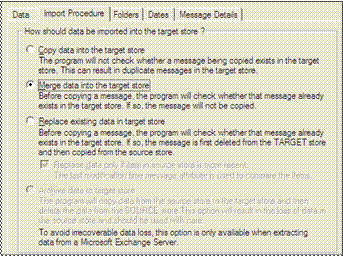
7. On the Import Procedure tab you can select your import method. The Merge method is recommended for most cases as this option will only restore messages that do not already exist within your Exchange Server:
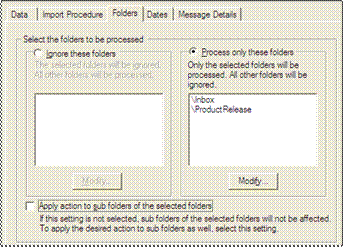
8. On the Folders tab you can select which folders you wish to import. Leave this blank if you wish to import all folders.
9. On the Dates tab you can optionally choose the date range of messages you want to restore. Otherwise, simply choose
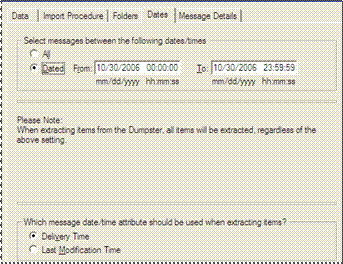
All to import messages from all date ranges:
Note: dates are in American format, as the ExMerge utility provided by Microsoft is not localized.
10. On the Message Details tab you can input subject or attachment filters for the restore (e.g. only import messages with the subject line ―Hello there)
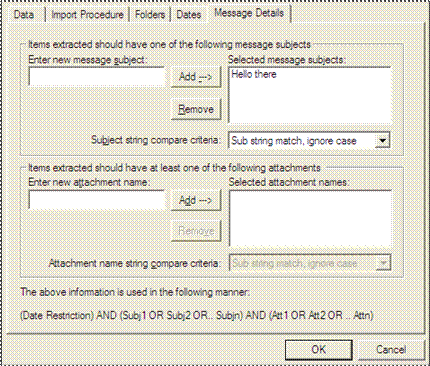
11. Click OK to close this window, and then Next to proceed with the restore.
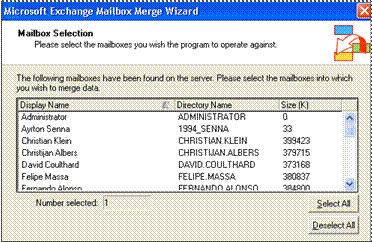
12. You can now select the mailboxes you wish to restore to:

13. Select the Default locale, click Next and then specify a directory where your PST mailbox backups are located:
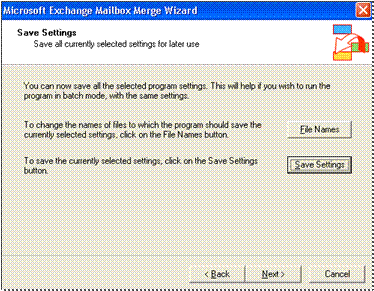
15. You can speed up the import process by saving your settings as default settings that can be later loaded and re-run next time you need to complete a restore of mailbox data:
16. Click Next to begin the mailbox restore. Once complete, a report will indicate the status of the ExMerge restore process.
6. Manually restoring Public Folders in Outlook
You can restore public folders directly back into your Exchange Server using the BackupAssist Restore Console (see section 5.2). You can also, however, manually restore public folder items from PST files in Outlook. This method is great for simple scenarios where a user has deleted one or more items from a public folder, and needs to retrieve the information quickly. You can also use this method to restore the contents of an entire public folder.
To manually open and restore a Public Folder PST backup in Microsoft Outlook:
1. Copy the appropriate PST file to a location that an Exchange administrator can access. The computer used to access this file must have Microsoft Outlook installed and be logged into by a member of the same domain as the Exchange Server.
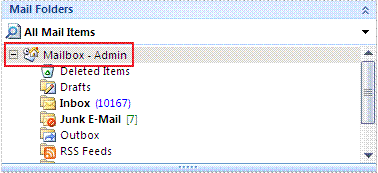
2. Launch Outlook and click Mailbox-[username] under the ―Mail Folders list on the left-hand pane. This will display the Outlook Today window.
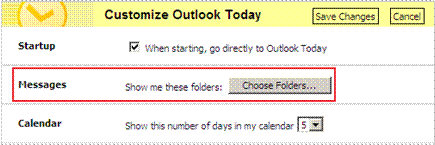
3. From ―Outlook Today, click Customize Outlook Today and then click Choose Folders.
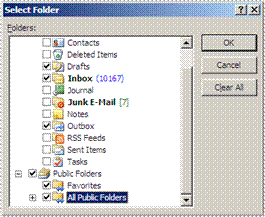
4. In the folder selection, check the public folders you wish to restore your PST backup to and click OK.

5. Click Save changes on the ―Customize Outlook Today screen.
6. You should now notice a new link to your Public Folders on the Outlook Today page under the Messages column.

Click the Public Folders link to view the available items.
7. Open the PST containing the Public Folder items you wish to restore. To do this navigate to File > Open > Outlook
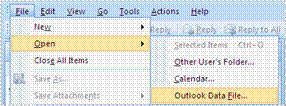
Data File from the top menu and browse to the location of your Public Folder PST backup.
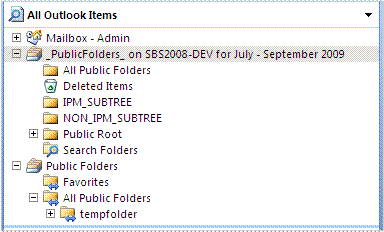
8. You should now have two Public Folder items listed under ―All Folders‖. The first is the backup you have just opened, which you can tell from the server name and archiving period contained in the heading (in the example below: SBS2008-DEV for July-September 2009). The second is your Exchange Server's Public Folder.
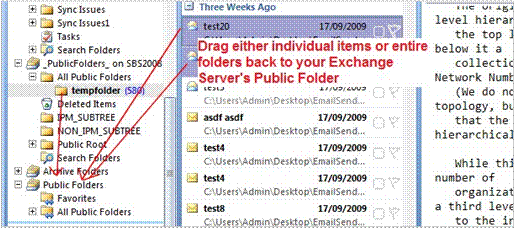
9. To restore your Public Folder data from your backup, simply select mail items or folders from your within your archive folder and then drag-and-drop them back to the Exchange Server's Public Folder:
7. Resources and Support
7.1 Useful resources
You may find the following resources useful:
Microsoft Exchange Server information:
http://www.microsoft.com/exchange/default.mspx
Microsoft Exchange Mailbox Merge (Exmerge.exe) information:
http://support.microsoft.com/kb/174197
BackupAssist Education Center (whitepapers, videos, tutorials, etc):
http://backupassist.com/education
7.2 Contacting support
Should you have any questions regarding either BackupAssist or the Exchange Mailbox add-on specifically, please email such queries to support@backupassist.com and we will respond to you as soon as possible.
Similarly, if you have any suggestions for additional functionality in BackupAssist, or new products or add-ons, please also forward such feedback to support@backupassist.com

 Belgium
 Canada
 Germany
 Italy
Italy France
 Spain
Spain United Kingdom

